A Step-by-Step Guide to Install Wood Deck Tiles
27/12/2024
Administrator
265
Interlocking wood deck tiles are an excellent choice for refreshing an outdoor area like a patio, balcony, or garden space. Made from durable, natural wood like acacia or teak, these tiles add warmth and beauty to your space with minimal effort. Follow this step-by-step guide to install interlocking wood deck tiles easily, without the need for a professional.
.png)
Step 1: Choose Your Wood Deck Tiles
Wood deck tiles come in a variety of wood types, sizes, and finishes:
Acacia Wood: Known for its durability, natural anti-slip texture, and beautiful grain, acacia is a popular choice for outdoor spaces.
Teak Wood: Teak is another durable option that’s naturally weather-resistant and maintains a beautiful golden-brown color with regular maintenance.
Kanhome Furniture offer an extensive selection of high-quality wood deck tiles, expertly designed to enhance the aesthetics and functionality of any outdoor space.
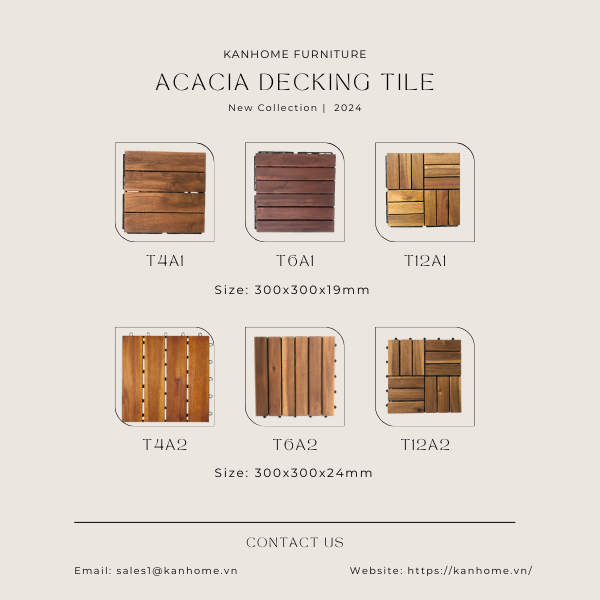
Selecting tiles with an interlocking system will allow you to install them without any tools, making it easy to rearrange or remove tiles as needed.
Step 2: Plan the Layout
Before snapping the tiles together, decide on your layout to ensure you have enough tiles and that the pattern aligns well with your space.
Test-fit a few tiles in the starting corner to visualize how they’ll look.
1. Measure the Area:
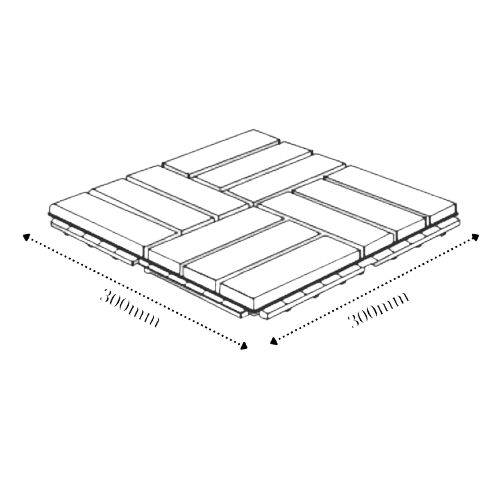
Measure the length and width of the space and calculate how many tiles you’ll need. Consider purchasing a few extra in case of cutting or replacement needs. Decking tiles typically come in standard sizes such as 300x300mm, 12x12 inches. Measure and mark boundaries if the installation area isn’t square or rectangular. This will help guide your installation.
2. Decide the Pattern: Some tiles can be arranged in various patterns, like checkerboard or straight alignment. Lay out a few tiles to visualize the look you want and decide the starting point (often a corner).
Step 3: Prepare the Surface
For best results, install interlocking deck tiles on a flat, clean surface:
1. Clear the Area: Remove all furniture, plants, dirt and sweep away leaves or dust from the area where you’ll install the tiles.
2. Inspect the surface for any imperfections, as major uneven areas can affect installation. Deck tiles work best on solid surfaces like concrete or wood, though some options may work on level grass.
3. Level the surface if necessary. This may involve smoothing down areas or adding a base layer for stability on softer surfaces like dirt.

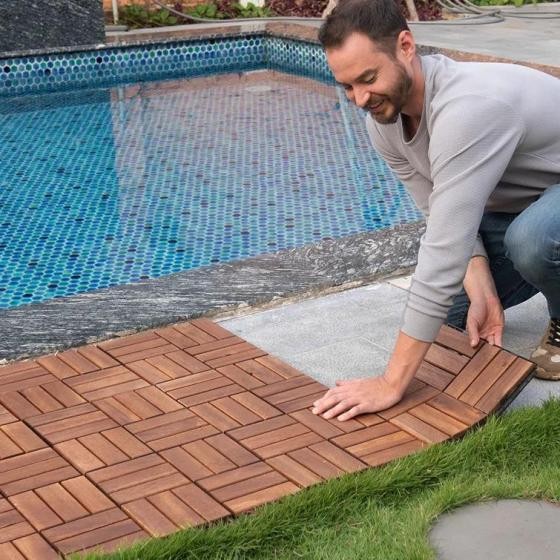
Step 4: Begin Installation
Once your layout is planned, it’s time to put down the tiles:
1. Start from a Corner: Begin in one corner or along a straight edge of the area. Place the first tile and press down to secure it firmly.
2. Connect Tiles: Align the interlocking edges of each tile with the adjoining tiles. Press down until you hear a click, ensuring each tile snaps securely to its neighbor. Continue row by row, making sure to align each tile correctly.
3. Cut Tiles as Needed: For edges or around obstacles, use a handsaw or jigsaw to trim tiles to fit precisely.
Step 5: Check for Stability
Once all the deck tiles are installed, inspect the surface for any gaps, unevenness, or visible seams. Make any necessary adjustments or corrections to ensure a smooth, uniform appearance across the entire deck surface
Step 6: Finishing Touches
Add finishing touches to give your space a polished look:
1. Install Edge Trim: If desired, add trim around the edges of the deck for a professional finish. This not only looks good but helps prevent tiles from shifting.
2. Place Outdoor Furniture and Decor: Once the installation is complete, add furniture, potted plants, or lighting to personalize your new deck area.

Maintenance and Care Tips
To maintain the beauty and longevity of wood deck tiles, follow these maintenance and care guidelines:
1. Regular Cleaning: Sweep away leaves and dirt and periodically clean with mild soap and water as needed with a soft-bristle brush or mop. Rinse thoroughly with clean water to remove any residue or buildup.
2. Avoid Harsh Chemicals: Avoid using harsh chemicals, abrasive cleaners, or pressure washers on wood deck tiles, as these can damage the surface and compromise the integrity of the material.
3. Preventative Measures: Place furniture pads or protective mats under heavy furniture or objects to prevent scratching, scuffing, or indentations on the deck surface. Use caution when moving or repositioning heavy items to avoid damaging the tiles.
4. Inspect Regularly: Periodically inspect the deck tiles for signs of wear, damage, or deterioration. Replace any damaged or broken tiles promptly to prevent further issues and maintain the structural integrity of the deck surface.
For more information, please contact us at:
Email : sales1@kanhome.vn
Whatsapp: +84963474 951